HI, WELCOME TO NINA TEMPLATE PAGE.
If you follow the instructions, you’ll end up with a design that resembles the demo. I recommend having the demo opened in a different tab and use it as a reference.
NEED HELP?
Please, check the TROUBLESHOOTING section at the end of this page. If your problem is not solved there, use the support form here to get priority over my regular email.
CHANGELOG
Version: 1.0.0
– Release date: May 2020
RECOMMENDED IMAGE SIZES
HEADER: 600px(w) x 150px(h). PNG with transparent background will work better.
HOME SECTIONS: Left and right: 1200px(w) x 1500px(h) – Newsletter: 1200px(w) x 800px(h).
POSTS: 800px(w).
LET’S START!
1. INSTALLATION
NEW BLOGGER DESIGN:
Go to THEME > Click on the three dots at the right > Restore > Upload the .xml file.
OLD BLOGGER DASHBOARD:
Go to THEME > Restore/Backup > Upload the .xml file.
2. MENU SETUP
Go to LAYOUT > MENU > EDIT.
In the NEW SITE NAME field, add the title that will appear on the menu (ie. HOME). In the NEW SITE URL field, add the page URL, don’t forget to add the HTTPS:// prefix. Click on ADD LINK.
To create a drop-down menu, add the parent item name, in the URL field add a hashtag (#). To create the child item, add an underscore (_) before the title name and add the page URL, make sure the child items are placed under the parent item, see example below:
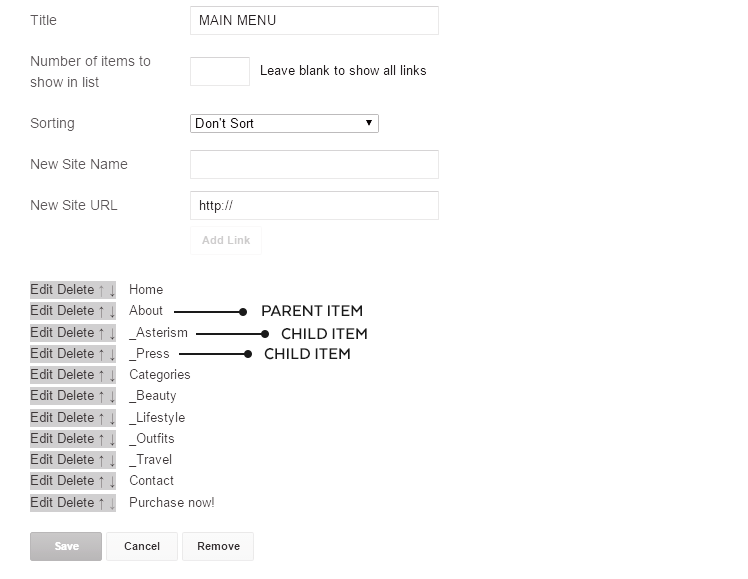
When you’re happy with the end result, SAVE changes.
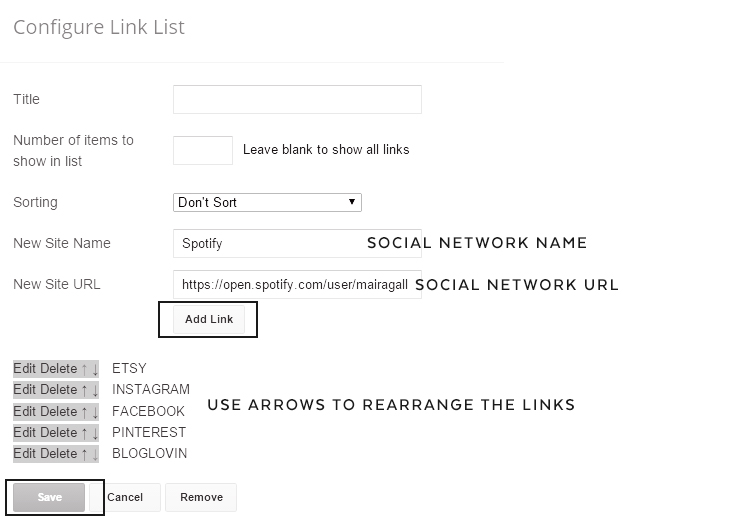
3. SOCIAL ICONS SETUP
Open the SOCIAL ICONS gadget, add your social network name and link, click the ADD LINK button and repeat with each social icon you need. Use the arrows to rearrange the order of the icons and SAVE.
4. HOME INTRO SECTION
Open the IMAGE widget in the INTRO-LEFT section. Upload an image (1200×1500) and SAVE.
Open the HTML widget in the INTRO-RIGHT section. Edit the title and text, SAVE.
5. HOME BIO SECTION
Open the TEXT widget in the BIO-LEFT section. Edit the title and text, SAVE.
Open the IMAGE widget in the BIO-RIGHT section. Upload an image (1200×1500) and SAVE.
6. MAILCHIMP FORM SETUP
Open the IMAGE widget in the NEWSLETTER section. Upload an image (1200×800) and SAVE.
Open the HTML gadget, replace your FORM ACTION in the form code and SAVE.
IMPORTANT: You need a MailChimp account and an Audience created to use this form.
How to get the MailChimp form action. (follow until step 5, copy that link into your browser and then copy the new link in the FORM ACTION area of the code I provide).
7. SERVICES SECTION
Open the HTML widget in the SERVICES section. Edit the title and SAVE.
Open each of the IMAGE widgets. Upload an image (preferably cropped as a square, but it will be auto cropped if it’s not), edit the title, link, caption, and SAVE.
NOTE: If you want to add a button, add this code at the end of the caption:
<br><br><span class="button">LEARN MORE</span>
8. FEATURED IN SECTION
Open the HTML widget in the LOGOS section. Edit the title and SAVE.
Open each of the IMAGE widgets. Upload an image (preferably PNG with transparent background) and SAVE.
NOTE: If you want to delete this section, remove all gadgets on it and then add this code in the CSS box in THEME > CUSTOMIZE > ADVANCED > ADD CSS:
.as-seen {
display: none;
}
9. BLOG SECTION
Open the HTML widget in the MAIN section. Edit the title and SAVE.
Open the BLOG POSTS widget. Select the post quantity you want to display (I recommend 7 to 10) and SAVE.
NOTE: If you want to hide this section, add this code in the CSS box in THEME > CUSTOMIZE > ADVANCED > ADD CSS:
.index .site-inner {display: none;}
Keep in mind that none of the blog pages (posts, categories, search results) will be shown.
10. INSTAGRAM GADGET SETUP
Go to Snapwidget > Widgets > Create an account and select the FREE Instagram Grid widget.

In the Username area, you’ll be prompted to log in to your account to get the permissions required to display the feed.
Then, select 8 columns x 1 row, 0 photo padding, Fade Out hover effect, and YES to Responsive (this is very important).
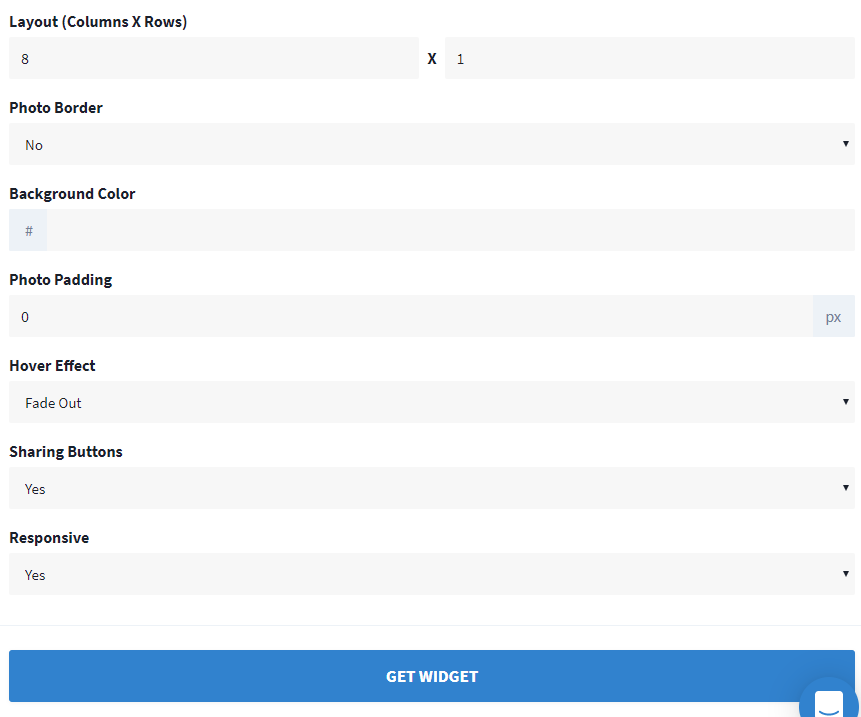
Click on GET WIDGET. Click on COPY TO CLIPBOARD.
Paste the code in the SNAPWIDGET CODE HTML widget and SAVE.
11. CUSTOM 404 PAGE
Go to SETTINGS > SEARCH PREFERENCES > CUSTOM PAGE NOT FOUND. Add the following content and edit the text as you wish:
<h2>404</h2>
<br/>
<h4>Oops! That page can’t be found.</h4>
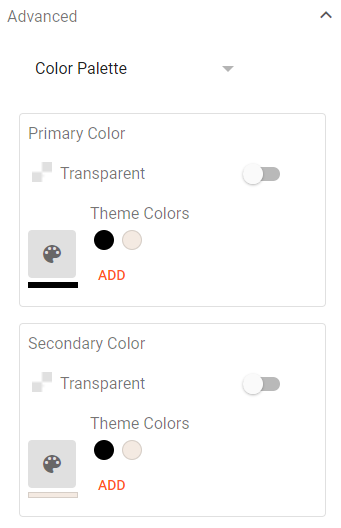
12. CUSTOM COLORS + FONTS
Go to THEME > CUSTOMIZE > ADVANCED. Use the dropdown arrow to navigate the different options.

13. ENABLE RESPONSIVE DESIGN
Go to THEME > Click on the arrow next to CUSTOMIZE > Mobile settings > Choose DESKTOP.
TROUBLESHOOTING
THE HEADER IMAGE IS BLURRY
The header image supports retina display. To prevent blurriness create your header at 600px wide and 150px high, make the content reach both sides so no empty space is left. Once uploaded it will display at half the size and perfectly sharp.
MY GADGETS DON’T LOOK LIKE THE DEMO
It is very important that you don’t delete any of the gadgets installed with the template, you can’t replace them because they’re modified to achieve the desired design and functionality. If you mistakenly deleted a gadget, the only fix is to reupload the template (some changes will be lost).